Tuesday, December 27, 2022

SSS Reindeer Cards


Hi, crafty friends!

It seems late but I'm going to share two Christmas cards which feature some recently released Simon Says Stamp products : Holiday Sparkle , Cozy Hugs, and Hugs Release. For each card, I made a background panel using Spun Glass Embossing Folder, which was splattered with some inks, and then I simply adhered Reindeer Parts Diecuts and Merry Word Diecuts on the panel. 


As Christmas was just around the corner, I needed to quickly make simple cards, and the Reindeer Parts Dies seemed perfect as a focal point for CAS design. FYI, I'm listing the supplies I used for each card below the photo. Hope it'll help. 


Supplies : Cream Cardstock, Neenah Desert Storm 100LB, Schoolhouse Red Cardstock, , Vellum, Gold Glitter Cardstock, Distress ink Ground Espresso for ink blending of edges, Prima Metallic Accents , white Pom PomsFoam tape, Bearly Art Glue, Copic Marker R20 & R30, White Gel pen


Supplies : Ivory CardstockNeenah Desert Storm 100LBSchoolhouse Red Cardstock, Neenah Texture Cardstock Brown, White gouache, White crdstock, Distress ink Ground Espresso, Copic Marker R20 & R30, W10,  White Gel pen


That's it for me for today. Thank you for stopping by! 
Happy New Year !

MARGE 


Monday, December 5, 2022

PPP Stencil Card with Watercolored Diecuts


Hi, friends! 

Are you done with your holiday cards to be sent to your friends? Well, I'm not ( You know I suffer from spine problems recently) so I've been busy making up for lost times. 

Today, I've got a card featuring the Pretty Pink Posh Layered Winter Foliage Stencils and Joy Dies set


For background I trimmed a piece of watercolor paper into A2 size, then I lightly colored the panel with Antique Linen ink and a blending brush. I then placed Layered Winter Foliage Stencils on the panel and ink blended it one by one. I used Peeled Paint, Gathered Twigs, Lumberjack Plaid for ink blending.  


Next, I splattered the panel wth Prima Marketting Metallic Accents and let them dry. 


Next, I die-cut JOY from watercolor paper, and I watercolored the diecuts in red, yellow, deep green and then I splattered with gold metallic ink and white gouache. 


I die-cut JOY again from white cardstock and gold glitter cardstock, then I adhered each peace on the back of watercolor pieace using a glue. The finished letters were mounted on the center of stencil panel using square foam adhesives.  Before that, I distressed all the edges using a distressing tool. 


A sentiment 'to the world' from Joy Stamp Set was heat embossed in white on Midnight Green Cardstock and was foam mounted on the letter O. 


As a finishing touch, I adhered 3mm Sparkling Clear Sequins , and added a twine ribbon on top. 


Thank you for stopping by! 
Have a great day.

Marge


Friday, December 2, 2022

PPP Stencil Background Holiday Card


Hi, friends!

I've got a stencil background holiday card to share with you today. 


I started this card with Layered Winter Foliage Stencil. I applied regular distress inks on the watercolor cardstock through the stencil and slightly water-brushed the images for a watercolor look. Doing this, I watercolored the ones with pale shades using the same distress inks. I repeated this for each stencil layer. Distress inks I used are Peeled Paint, Gathered Twigs, Lucky Clover, and Lumberjack Plaid.


Next, I splattered the stencil panel with white gouache and metallic inks gold/black then I trimmed it into A2 size (4.25 x 5.5 inch) . I die cut Scallops Oval from the another watercolor paper to make center frames and adhered them on the stencil panel using foam adhesives. You can see that I used thicker adhesives with the larger frame, and thinner with the smaller for dimensional look.


Next to the foliages, I die-cut Winter Foliage from various colored cardstocks and added more shades using dye inks. I also added splatters of gold metallic ink and white gouache on them. 


Next, I adhered the foliages around the oval frames, layered a piece of vellum sheet with "Joy" letter from Pine Wreath Set, which was heat embossed in gold, then I added a pine  cone and other foliages around the banner. As a final touch, I adhered a red ribbon from Pine Wreath Set on the top of the frame. 


That's it for me for today. Thank you for stopping by.

Happy December!

MARGE


Thursday, December 1, 2022

SSS DieCember® 2022 Inspirations


Hi, friends!

It's been a while since my last post. I've been having recurred back & neck problems so it's been hard to sit on for crafting.  I'm trying to get healthy again doing some stretching and exercise.  


It's finally the release day for Simon Says Stamp DieCember® 2022 and I'm going to share several cards with you today.


These days, I enjoy ink blending on colored cardstock as it creates unique shades compared to inking of white paper. In this first card, I picked Cream cardstock and made a front window panel using Foliage Circle Die. I then colored foliage with Copic Markers. For sentiment, I stamped a sentiment from Greetings Mix 1 set with Versafine Clair Nocturne.   


For backdrop, I added Tattered Rose and Worn Lipstick to Cream cardstock piece using Large Blending Brushes. I used thin foam adehsive to adhere the front window and backdrop panels, then I added splatters of Metallic Gold and white gouache.  


My second card was made in a very similar way to the first one. For different color schemes, I added Peacock Feathers , Dried Marigold, and Spiced Marmalade onto Cream cardstock. For the sentiment, I simply adhered a strip from Reverse The Best Friends set.  


For embellishment, I adhered Glitter Drops Aqua and Blush

The next two cards are featuring Joy To You Cover Plate Die


 I made colorful strips with 0.75 inch width by trimming colored cardstocks : Lemon Chiffon, Cotton Candy, Green Apple, Peacock Teal, Schoolhouse Red, and Midnight Green. I then arranged them onto a sticky sheet to make a strip patten background. Next, I die cut it with Joy To You Cover Plate Die to made a fun window panel. 


Next, I added white Joy To You diecut on the back of striped panel to hold the strips in place and I adhered acetate sheet for shaker window. Then I applied foam adhesives around each letter cut, put sparkling gold seed beads and sequins into them, and closed the shaker with a piece of Fog Gray


For the second card, I ink blended  Joy To You diecut in blue and orange, then I added gold accents onto all borders. For this, I simply applied Versamark Ink onto the edges, and gold embossing powder and used a heat tool to melt them.  


I also added gold accents with Glitter Paper Copper diecuts and Glitter drops Butterscotch.  The backdrop pattern paper is from Craft Corsortium Tartan 6x6 paper pack. For the tags, I used Stitched Dress Up Tags, and I adhered letters I got from Joy To You diecutting, which I colored using Copic markers. 


I love this new velvet cardstock set so much! They were cut easily when diecutting and the smooth surface texture made the cards look special! In this first card below, I dry-embossed Denim Velvet Luxury Cardstock withGilded Ornamental Embossing Folder, die-cut the coordinating Ornamental frame from Glitter Paper Gold, and Silver and adhered them using glue and foam adhesive. Sentiment was also cut from gold glitter paper and vellum sheet using Rejoice Shadow Waffer Die. For more glitter accents, I embellished it with Glitter drops Ruby and Butterscotch.


I made a shaker for the second card. I fussy cut acetate film using the negative cut of Gilded Ornamental die as a cutting guide, then I adhered the film on the back of Gilded Ornamental diecut frame to compose a window. I placed various gold and red sequins on the center of Gilded Ornamental embbosed panel made with Navy Velvet Cardstock, then I placed window frame onto them using foam ahesives. 


The sentiment is from Believe Shadow Die. As a final touch, I added ribbon with gold accents and Glitter drops Butterscotch.


Now, the last card for today features Sweet Tooth Bears set.


I colored the images using my Copic Markers. I used my Scan N Cut machine to cut the images but you can use coordinating dies set. 
For backdrop panel of infinity shaker, I used Iconic Christmas Stencil to add light pink and teal colors.  For soft color palette, I mainly used Easter Confetti Mix to fill in the shaker pouch. 


That's it for me for today. 
Thank you for stopping by.
Happy DieCember® and Happy Crafting ! 

Marge

Friday, November 11, 2022

Spellbinders Floral Reflection Collection Cards

 Hi, friends!

It's the new release day of Spellbinders Floral Reflection Collection and I'm so happy to share with you several cards for them. It was my first time trying glimmer hot foil system, which was very interesting. I'll share the brief making process with supplies below, hoping that you'll enjoyr them. 


Card 1. 


Backdrop panel : Dry emboss plum cardstock with Tile Reflection 3D embossing folder.

Base layer : Cut vellum paper with Essential Floral Reflection Etched Dies and then dry emboss it with Tile Reflection 3D embossing folder.

Middle layer : Hot foil piece made with Glimmer Essential Solid Floral Reflection Glimmer Hot foil plate and dies and Hot Foil Roll Matte Gold

Top layer : Hot foil piece made with Glimmer Essential Solid Floral Reflection Glimmer Hot foil plate and add another layer of hot foil using Glimmering Just For You Glimmer Hot Foil Plate with Hot Foil Roll Pink. Cut it with a coordinaging die. 


Card 2 & 3


Prepare A2 cardbase, hot foil it with Glimmer Essential Solid Floral Reflection Glimmer Hot foil plate & Hot Foil Roll Matte Gold. Add another layer of hot foil using Glimmering Just For You Glimmer Hot Foil Plate with Hot Foil Roll Blush


Card 4 & 5


Make watercolor panels using Mijello Mission Gold watercolor paints, let them dry. Hot foil the panels with Glimmering Just For You Glimmer Hot Foil Plate and Hot Foil Roll Gold


Trim over-foiled area out then I mounted the panel onto white cardbase. 
Add splatters of whithe and darker inks over the panel. Adhere sentiment and embellish the card with drops. 


Card 6. 


Hot foil Glimmering Just For You Glimmer Hot Foil Plate on a piece of watercolor paper, then color in the images using watercolor paints. 


The last three cards (Card 7 ~9) were made with layers of Tile Reflection 3D embossing folderEssential Floral Reflection Etched Dies and  Sealed Wildflower Etched Dies on the top. 

Card 7


Card 8


Card 9


That's it for me today. Thank you for stopping by! 

MARGE


Saturday, November 5, 2022

Waffle Flower November Release Blog Hop

 Hello, there!

Welcome to the Waffle Flower November Release Blog Hop!


I’m happy to be hopping with the folks from Waffle Flower to show you all the fun new stuff awaiting you on the Waffle Flower website! Be sure to check out each stop in today’s blog hop for fun, inspiration, and chances to win some of these new release goodies! 


Giveaways:

For today’s hop, Waffle Flower is giving away $25 gift certificate to THREE lucky winners. You can leave a comment on this blog and along the hop by 11:59pm EST on Thursday November 10th, 2022 for your chances to win. Winners will be chosen at random from the comments left on any of the posts in this blog hop and will be announced on the Waffle Flower Blog on 11/11/2022.

Specials:

From now till November 8th, 2022, all orders placed at waffleflower.com will receive a mysterious gift (No code required!).

For those of you who are new to Waffle Flower, they have a Last Chance section on their website that lists many goodies for 25% off until they are gone! This would be a great place to start your collection! And don’t forget to check out their monthly Flash Sales!


I'm going to share with you seven cards for the new release, today.  

My first two cards are featuring Outlined Hearts Die .


First, I die cut it out of watercolor paper, and I colored the Outlined Hearts diecuts using Mijello Mission Gold watercolor set. I die cut the hearts outlines three times and glued them layer by layer to add some dimension. 


I trimmed another watercolor panel into 4.25"x5.5" for a backdrop, and I lightly colored the center using DS and let it dry. All the edges were distressed using a paper distresser. 


Next, I glued the hearts outline on the panel and inlayed watercolored hearts. In order to give some interesting look, I added lots of splatters of darker paint, white gouache and metallic gold ink. 


A sentiment from Oversized Heart Stamp Set were heat embossed in gold on a vellum strip and I glued both sides of the strip onto the back of the panel. 


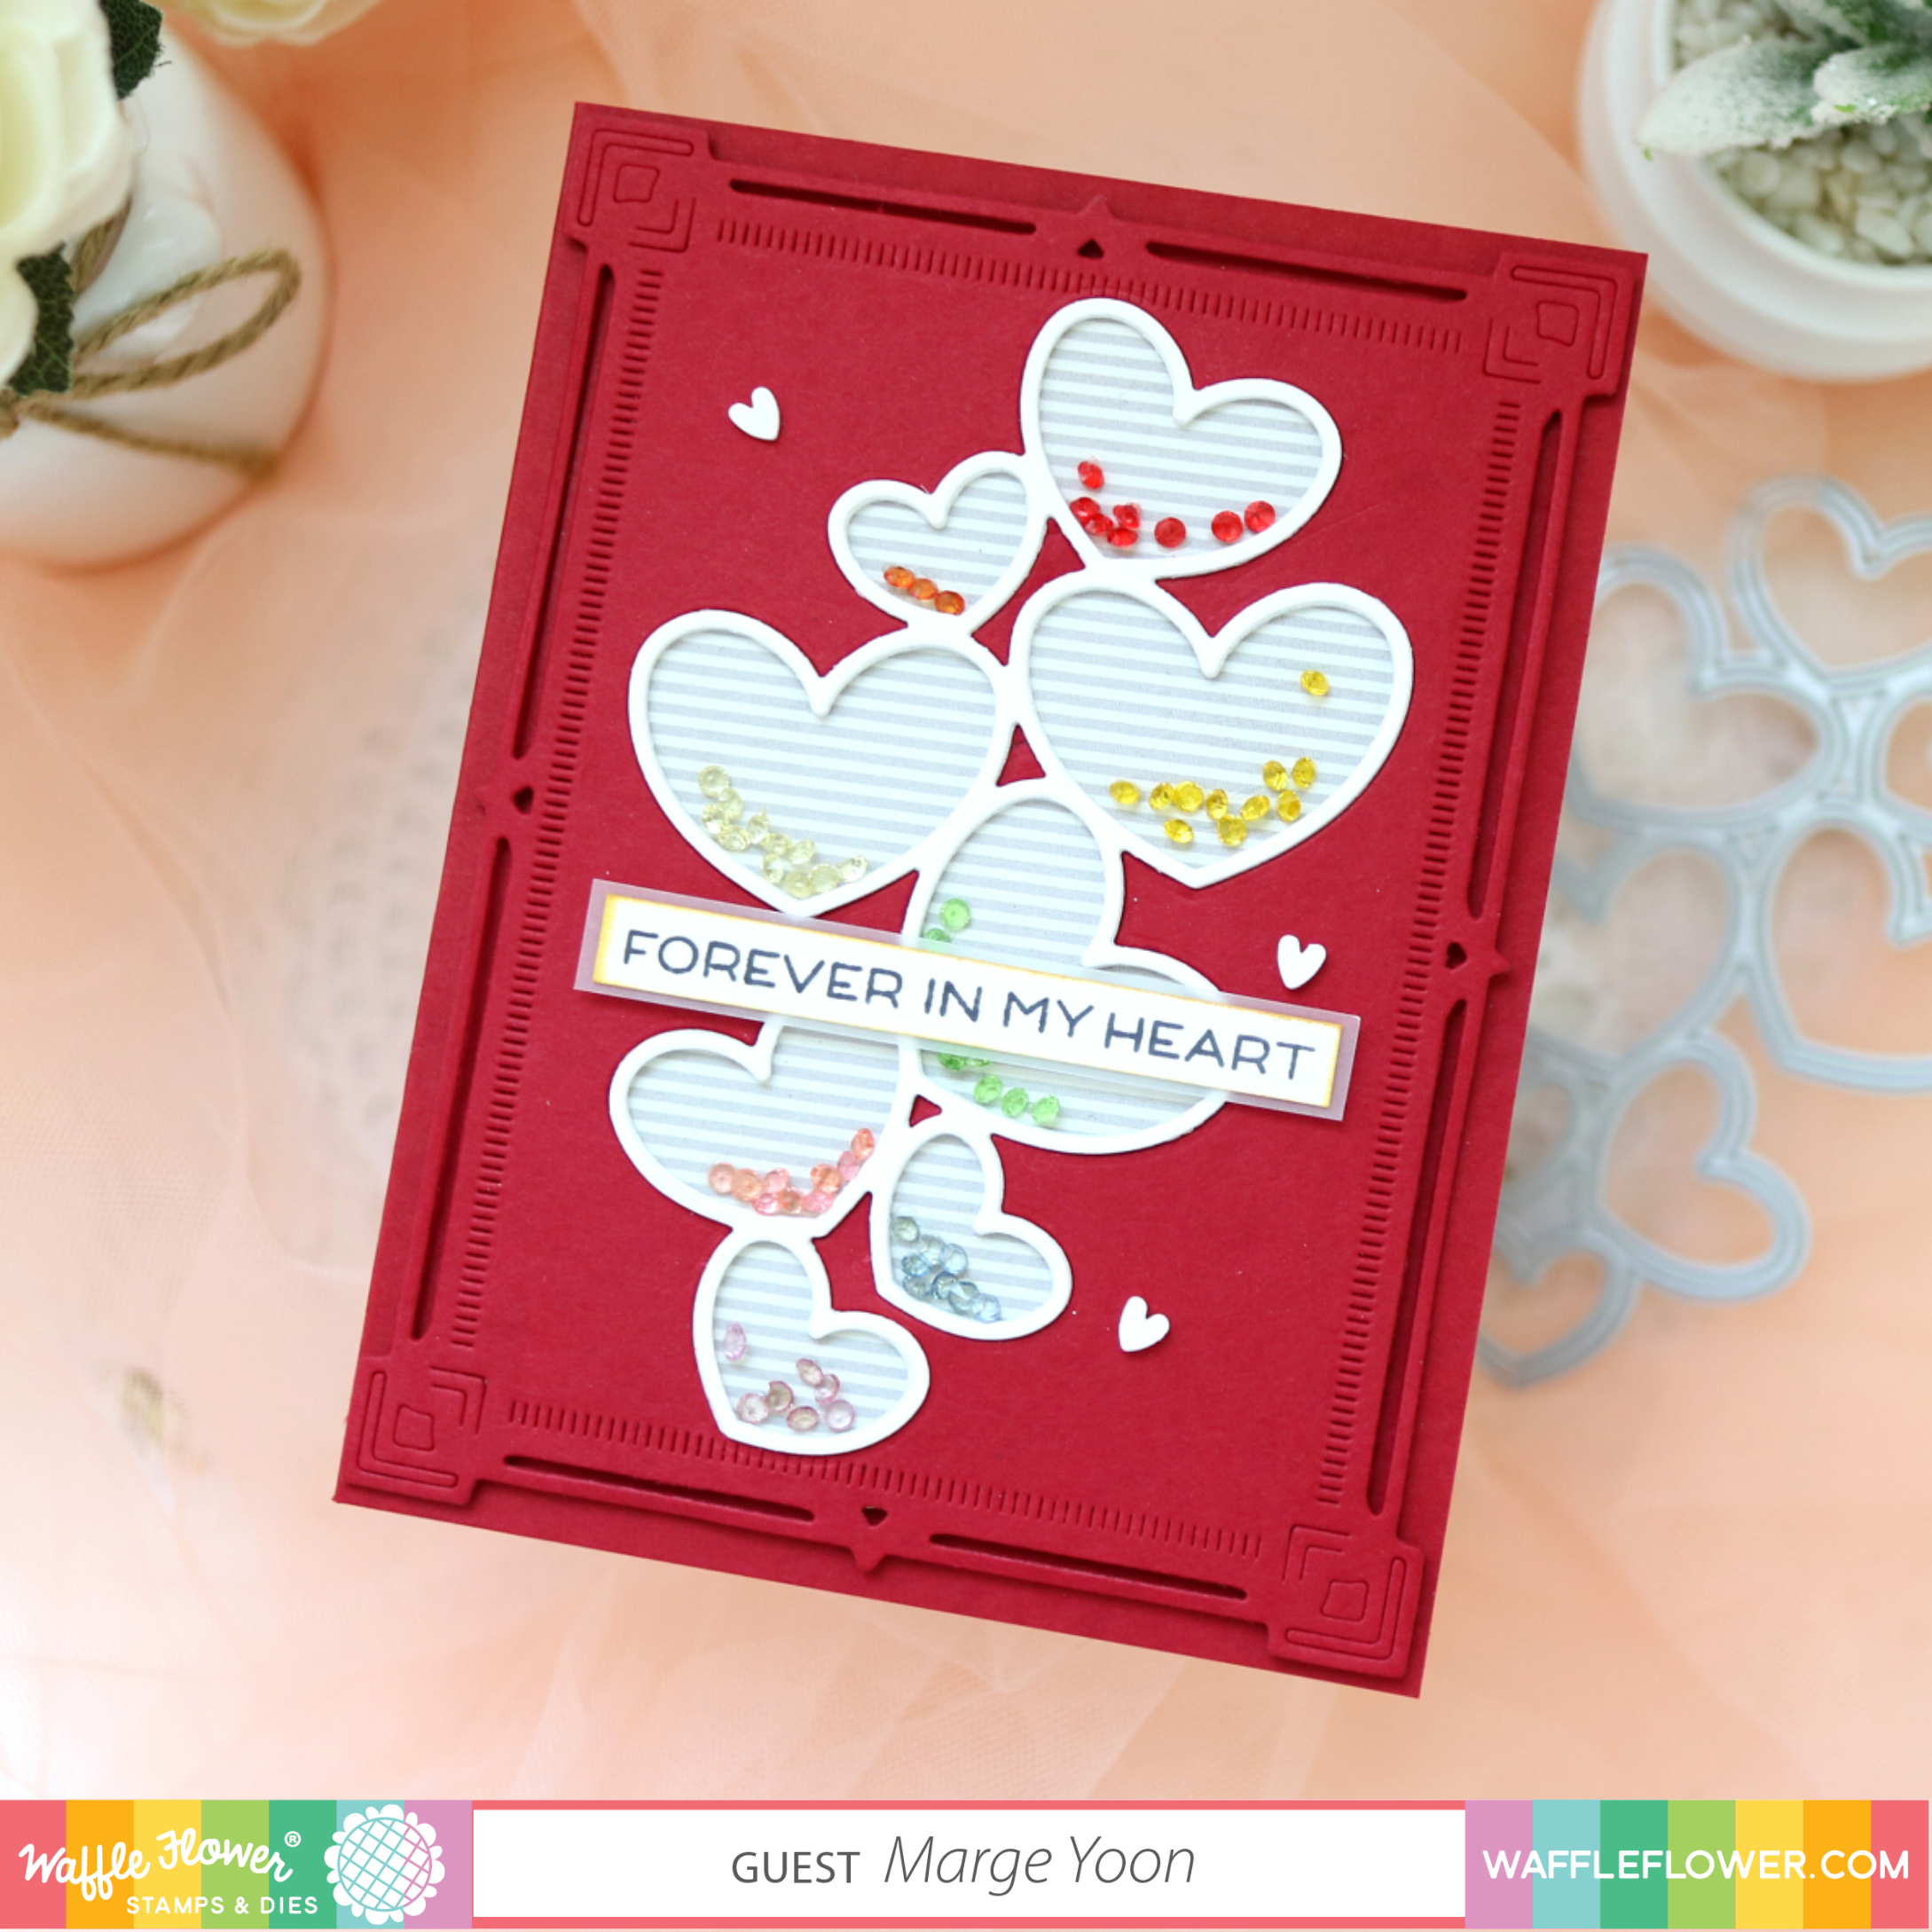
Moving on to the second card, I prepared a red backdrop panel by diecutting dark red cardstock with Fancy Frames Die, then I created negative cut window of Outlined Hearts Die on the center. I adhered the panel onto gray colored striped pattern paper, then I in layed white diecut of Outlined Hearts Die, which I glued three to four layers for dimensional look. 


I then adhered various colors of clear jewels into each heart well so that it looked like a shaker. But it's not a shaker ! Once again, I mounted sentiment block from Oversized Heart Stamp Set on top, and adhered the card front onto the same colored cardbase. 


For embellishment, I adhered a couple of white heart clay confettis, which added lovelier look to the card.


The next two cards mainly feature the Quilted Hearts Texture Die

For this card, I started with making gradient black and grey panel using watercoloring. I let the panel dry and then ran it through a cutting maching with Quilted Hearts Texture Die. I added darker shades to the heart by applying Black Soot DO ink through Quilted Hearts Coloring Stencil on top of the panel. I splattered with white gouache and metallic gold inks over the panel. 


Next, I adhered sentiments that were made using Oversized Heart Combo. For more embellishment, I watercolored hearts from Outlined Hearts  diecut pieces in red, yellow, and indigo, then I adhered them around the sentiment.  


I foam mounted my panel onto gray cardstock and finished off the card. 


For the second card, I decided to go with an infinity shaker. I made similar watercolor panel with Quilted Hearts Texture Die, then I heat embossed all the four edges in gold using versamark ink and gold embossing powder. 


I used OHP film to make infinity shaker pouch. It is thinner than the usual acetate sheets, so I can easily make score lines and fold it. I put lots of  sequins, confettis, and hearts clay confettis into the pouch, and sealed the shaker off. 


After I glued Oversized Heart Word Die cut which was colored with pink dye ink, I adhered the shaker onto a card base made with plum cardstock. 


Now, here're the last three cards which showcase the Quilted Hearts Coloring Stencil

For the first card, I cut a piece of Bristol paper with Quilted Hearts Texture Die, then I ink blended it lightly with DO Tattered Rose and Dried Marigold. I then placed Quilted Hearts Coloring Stencil - that matches with Quilted Hearts Texture Die - onto the panel, and applied various colors of dye inks through the stencil. 


For the larger hearts, I gave gradient colors from violet, pink to orange and for the smaller hearts, I colored in with puprple, navy, light blue and teal inks. You can use any colors of inks you have in your stash. 
 
I added splatters of inks, white gouache and gold metallic inks all over the panel, then I addhered sentiments from Oversized Heart Combo


Next is a duo of same design with different color palettes. 


I made colored panels with Quilted Hearts Texture Die and Quilted Hearts Coloring Stencil using various dye inks. To make front panels, I die cut ivory cardstock Nesting Portrait Arches Die and lightly colored them using a blending brush. 


I then foam mounted the front window panel onto my hearts backdrop. Before adhering them together, I made a vellum strip on which sentiments were heat embossed and glued it on the back of fron panel. The card base was made with eggplant cardstock. 


FYI, dye ink colors I used for the first card are Blush, Rouge, Coral Berry, Crimson, Velvet, Nimbus, Lagoon, Teal Cave, Galactic Stream from altenew. 


For the second card, I used Sicilian Amber, Yellow Ochre, Pumpkin Pie, Amethyst, Grape Agate, Plum, Andromeda, Firebrick, Orange Cream, Rouge, Coral Berry, and Crimson. 


That's it for me today. Thank you for reading this post.
 Next on the hop is Channin Pelletier
Be sure to visit other blogs given in the blog hop list below ! Enjoy! 

     - Blog Hop Full List - 


It's Grab Bag Time!


Grab Bags for up to 75% savings! *
Only Available from November 15th to November 30th each year.
Gift it to a friend or surprise yourself with some wonderful goodies! **

Choose from 3 types of bags:
Combos (stamps with matching dies)
Dies (stand-alone dies and nesting dies)
Stamps (stamps only)
You can purchase all types but each type is limited to 1 per customer. ***

* All grab bag sales are final, we cannot accept any returns or exchanges.
** If you have purchased a grab bag or last chance items from us before, or participated in our past sales, there might be overlaps.
*** No overlap among different types of bags.